The crust is such an important part of a pie, and let’s face it, NOTHING beats a homemade crust!
Making your own pie crust from scratch truly is not difficult. (And it’s so easy to make vegan pie dough! Simply use vegetable shortening or your favorite vegan butter, like Earth Balance Buttery Sticks, in place of the butter.)

Homemade Pie Crust: Delicious but Intimidating
What can be a little tricky is getting that dough into the pie dish! This tutorial will lay it all out for you, with pictures of each step. With a little practice, you’ll be a pro, and never go back to store bought crust again!
Let me recommend to you my favorite pie dish before we begin this crust tutorial. Not all pie dishes are equal in quality, and I definitely have two favorites: my jadeite pie dish, pictured above, and my Emile Henry pie dish–it’s the pink dish with the white interior you’ll see in the pictures below.
I lucked into my jadeite pie dish, but the Emile Henry dish is available here on Amazon [aff. link]. After all your hard work making your pie crust from scratch, you’re going to want to have that work rewarded with a delicious tasting pie. So put that pie in a pie dish you can trust!

Whenever I don’t want to worry about any variations in how my pie will bake (like if I’m trying to impress my family on Thanksgiving!), I will always use my Emile Henry dish [aff. link]. It’s made in France from Burgundy Clay, which means your pie will bake evenly in the oven. Emile Henry dishes are also easy to clean, AND they’re great for in the oven, freezer, refrigerator, and microwave. Can you tell I love this beautiful pie dish? If you’re serious about baking fantastic pies, this is the pie dish for you! [aff. link]
Oh, and also, I’ve had my Emile Henry pie dish since 2012, and it still looks brand new. A definite quality plus!
Ok, now let’s make a pie!
Start with the Pie Crust Dry Ingredients

First, add your dry ingredients to a medium to large mixing bowl. (For my single pie crust recipe, click here. For my double pie crust recipe, click here.)
Cut in the Vegetable Shortening and Butter

Now add in the cold butter and shortening. With a pastry cutter or your hands, cut the butter and shortening into the dry ingredients. I always use my hands. Basically, just work the butter and shortening into the dry ingredients until you end up with a crumb topping-like mixture, with little balls the size of peas.
Add the Milk

Add in the cold milk, and mix until the pie dough comes together. If it feels a little dry, add an additional tsp or two of cold milk.
Refrigerate the Dough

Now form the dough into a disk(s). If you are making a single crust, do not split the dough into two disks, simply form the dough into one disk.
If you are making a double pie crust, split the dough in half, and form it into two evenly sized disks.
Put the disk(s) in the refrigerator, and refrigerate the dough for at least a half hour. (You can also wrap the disks in saran wrap, and freeze them if you won’t use the dough right away.)
Flour Your Workspace

After a half hour, or whenever you are ready to make the pies, flour your kitchen counter top, and take one dough disk out of the refrigerator. (If making a double pie crust, keep the second dough disk in the refrigerator for now. We’ll come back to that second dough disk later!)
Roll Out the Dough

Roll the dough out on a floured surface. (Rolling the dough on a floured surface will make lifting the dough into the pie dish easier!)
Roll the dough out to the point that if you were to place the pie dish on top of the rolled out dough, there would be 2-3 extra inches of dough around the circumference of the pie dish. Trim excess dough if necessary.
Fold the Dough in Half

Now that the dough is rolled out, gently fold it in half, taking care not to press it together!
Fold the Dough in Half Again

Fold the dough in half one more time. So you have effectively folded the dough into quarters.
Transfer the Dough to the Pie Dish

Oil your pie dish. Gently lift the folded pie dough and place it in the pie dish so that the two folded sides of the dough are in the pie dish, and the edge of the dough is going out over the edge of the pie dish.
Unfold the Dough

Now carefully unfold the pie dough. Start by unfolding it from the quarter so it is now just folded in half.
Then gently unfold it so it is no longer folded in half, and is completely open, and on top of the pie dish.
Gently press the dough down into the pie dish.
For a Single Pie Crust
Jump to Double Pie Crust Steps

Once you have put the rolled out pie dough into the pie dish, take the dough that extends over the edge of the pie dish and fold it in half, down towards the pie dish.

Here’s that step in action!
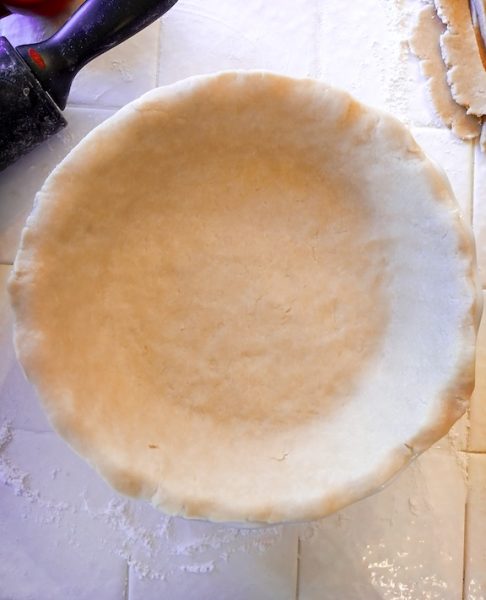
Scallop the Edge

With the dough that remains above the pie dish, use your index finger to make a scalloped edge.
Now freeze the pie dish with the dough inside (now we call it the pie shell!) for 15 minutes. Freezing the pie shell will help prevent our crust from shrinking too much as the pie bakes. It will also help the pie crust from getting over-baked on pie fillings that require a longer cooking time.
Now you’re ready to put the filling inside and bake your pie according to recipe instructions!
For a Double Crust

So you’ve got the bottom crust in the pie dish, awesome job! Now it’s time to prepare that second disk of dough.
Choose the best time to put the filling into your pie shell. Depending on your recipe, this could be before or after you have rolled out that second disk of dough. Just make sure that you’ve got the filling in the pie shell before we put the top dough over the pie!
Roll Out the Second Disk of Dough
Take the second disk of dough out of the refrigerator, and roll it out on a floured surface, just as you did the first dough disk.
Put the Top Dough Over the Pie

Carefully lift up the dough you just rolled out, and as best you can, carefully lower it, centered, over the pie dish. You can trim some of the excess dough if needed/desired at this point as well.
Now crimp the bottom and top dough edges together with your fingers to create a seal—this will keep the filing inside the pie while baking.
Fold the Dough Edge

After you have crimped the top and bottom pie dough together, fold that crimped dough that extends over the pie dish in half, down towards the pie dish.

Here’s that step from another angle.

So it looks like this around the whole pie once you’ve finished!
Scallop the Edge

With the dough that remains above the pie dish, use your index finger to make a scalloped edge.
Make a Vent

Now create a little vent to let steam escape while the pie bakes. I like to do this with a sharp knife in the center of the pie by making a little crow’s foot shape.
And now you’re ready to bake your double crust pie according to your recipe’s instructions!
(Note: I always freeze my sigle crust pie shells before baking. I have never frozen a double crust pie before baking. I suppose you could, but i have never had a reason to, so I can’t say if it is beneficial or not. In my experience, crust shrinkage is less of an issue with a double crust, as is the possibility of having an overdone crust edge.)
And That’s It! Homemade Pie Crust!

Awesome job!!!! You successfully made a pie with a beautiful, homemade crust!
Now enjoy that pie! ❤️

There really is something magical about homemade pie dough! It takes a good pie and makes it delicious. Great tips about rolling that pie dough here. Thanks so much for sharing, Shannon. Also, that Chocolate Butterscotch Chip Pie sounds quite tasty!
Thank you so much David! I completely agree, homemade pie dough is absolutely the BEST. Store bought just can’t compare! Thank you so much for your kind comment! ❤️