These Kitchen Sink Cookies are a variation on my Best Chocolate Chunk Cookies recipe.
The term “kitchen sink” refers to putting everything but the kitchen sink into the cookie dough.
In other words, search the pantry, and get creative with what you’ve got on hand. That’s how I discovered what my favorite kitchen sink cookie add-ins are.

Add-ins for Kitchen Sink Cookies
I’ve made these cookies with pecans, pine nuts, and walnuts. I’ve made them with milk and dark chocolate chips, butterscotch chips, and chocolate chunks. And I’ve made them with heath bar bits and Kraft caramels.
Eventually I’ll try adding in crushed pretzels or coconut flakes.

My Favorite Kitchen Sink Cookies
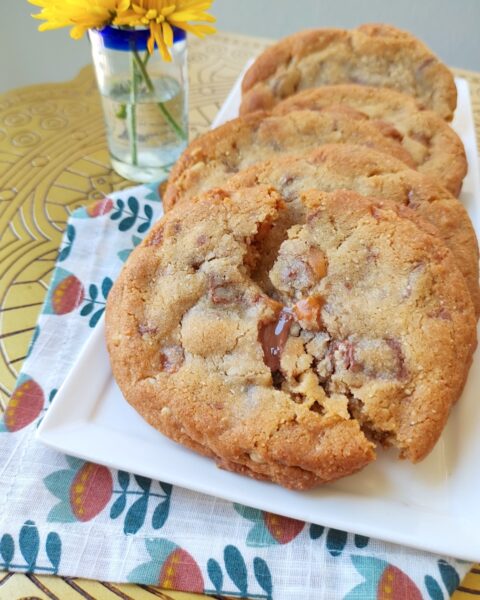
If you’re looking for a fool-proof kitchen sink cookie combo, here’s my favorite: pine nuts, heath bar bits, milk chocolate chunks, and caramels.
This combination makes a cookie with great texture. My favorite element of this combo is how the sweetness of the dough is tempered by the slightly salty heath bar bits.
Make these Kitchen Sink Cookies for a delicious and flavorful spin on chocolate chip cookies. You may find you like them even more than the classic.

A Few Things!
Here’s my favorite spatula on Amazon [aff. link]. Though I use it for everything, this spatula was specifically designed to get cookies off the baking sheet. So it’s perfect for these cookies. You can also find this spatula in my Amazon store here.
Heath bar bits can be hard to find. They’re not always at the grocery store, and they’re pretty expensive on Amazon [aff. link].
If you want to save some money, just buy a heath bar at the grocery store and chop it up yourself. Ideally, you’re already chopping up a chocolate bar for the chocolate chunks in these cookies—read here why chopping chocolate chunks up yourself is always better for cookies than using bagged chocolate chips—so adding a heath bar to the cutting board isn’t much additional time.

Kitchen Sink Cookies
Ingredients
For the wet ingredients
- ¾ cup sugar
- 1 cup brown sugar
- 1 cup butter, softened
- 2 eggs
- 2 tsp pure vanilla extract
For the dry ingredients
- 1 cup almond flour
- 2 ⅓ cups all purpose flour
- ¾ tsp baking soda
- ½ tsp salt
- 8 oz chocolate, chopped into chunks
- ⅓ cup Heath Bar bits
- ½ – ¾ cup nuts, chopped (I prefer pine nuts. Pecans or walnuts work great too.)
- 8-9 Kraft caramels, chopped into pieces (optional)
Instructions
Cream together the wet ingredients
- With a stand or handheld electric mixer, cream together the sugar, brown sugar, and butter. Cream until the mixture gets fluffy and lightens, about a minute or two.
- Now add the eggs and vanilla, and beat for two minutes. The mixture will get a glossy look and an even creamier texture.
Add the dry ingredients
- Next, add the almond flour and all-purpose flour, followed by the salt and the baking soda. Mix until everything is mostly incorporated.
- Now add in the chocolate chunks, Heath bar bits, pecan pieces, and Kraft caramel pieces (if using), and mix until everything is fully incorporated. It's best to mix all these add-ins in by hand with a spatula, otherwise they'll get stuck in the mixer beaters.
Shape the dough balls and refrigerate
- With your hands, roll the dough into cookie dough balls. Each ball should be about 2 Tbsp worth of dough. You will end up with about 18-20 cookie dough balls
- Place the dough balls on a plate or flat dish, and refrigerate for at least 30 minutes, and up to two days. Alternately, you can freeze the dough balls for later use.
Bake the cookies
- Preheat your oven to 375 degrees.
- Evenly space out 6 balls of cookie dough on a standard baking sheet. Gently flatten each dough ball with your hand so it looks like something between a ball and a disk. (This is the best shape for making cookies that spread just enough during baking.)
- Bake for 8-11 minutes, until the edges of the cookies are light brown, and the middle is set but still looks soft and dough-y.
Cool the cookies
- Remove the cookies from the oven, and let them rest on the baking sheet for 5-7 minutes. The cookies will set and continue to bake on the baking sheet outside of the oven, so be patient. This step is very important!
Serve and enjoy!
- After 5-7 minutes, remove the cookies from the baking sheet, serve, and enjoy!
Favorite cookie ever, yum!
Saw the pin on pinterest and knew I had to make these! So good!
That’s great to hear, thanks Steph!